THDL Toolbox > Tibetan Scripts, Fonts & Related Issues > Tibetan Input Tools > Installing A Tibetan System Keyboard in Windows XP
Installing A Tibetan System Keyboard in Windows XP
In addition to the system keyboard files that come bundled in Windows XP (which do not include any special keyboards for Tibetan), you may want to install a system keyboard file that you have found elsewhere. There are a number of free Tibetan Unicode system keyboards available for Windows that you can find off the Internet. Here, we will go through the process of installing the “Dzongkha Keyboard.”
Note: A “system” keyboard is somewhat different from the other 3rd-party keyboard solutions you may have seen for Tibetan computing. As opposed to other keyboard software, such as Keyman, which require an application “middle layer” to drive the keyboard layout, a system keyboard is supported by the Windows system at a root level. A system keyboard is compiled to work intrinsically and smoothly in a Windows environment, and becomes an integral part of the operating system. System keyboards not only work more reliably, but function in better harmony with applications that recognize the presence of system keyboards (such as Microsoft Office). Whenever possible, you should use an actual system keyboard for typing Tibetan text.
First, find yourself a copy of the system keyboard you want to install (usually by downloading it). If the download file came as a compressed zip file, uncompress it. You should have a folder now that contains several files, one of which is named “setup” or “setup.exe” (Figure 1).
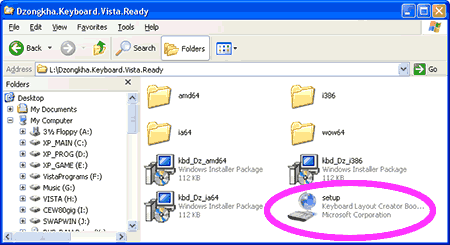
Figure 1: The file contents of the keyboard package
Double-click on the setup file and wait for a few moments. After a minute or so, you should be informed that the installation is complete (Figure 2). Go ahead and click “Close” to exit from the installation process.
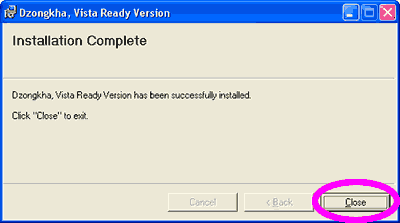
Figure 2: Installation of the software is complete
The keyboard has been installed now, but not activated for use. You next need to make your new keyboard available to your computer desktop so that you can turn it on when you need it. For this, go to the Control Panel (Figure 3).
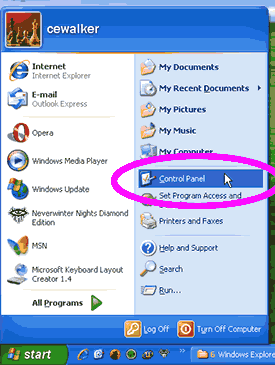
Figure 3: Finding the Control Panel
Once in the Control Panel, find the icon for “Regional and Language Options” and double-click on it (Figure 4).
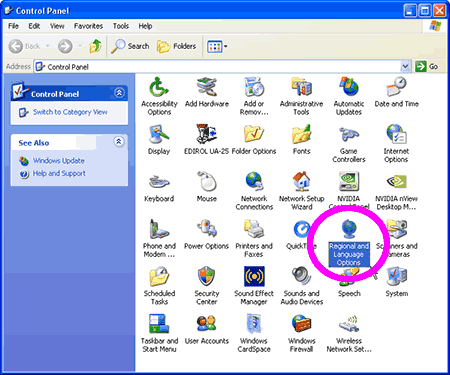
Figure 4: Finding Regional and Language Options
This will bring up the Regional and Language Options dialog box, which has three tabs at the top. Click on the tab labeled “Languages,” and then click the button labeled “Details…” (Figure 5)
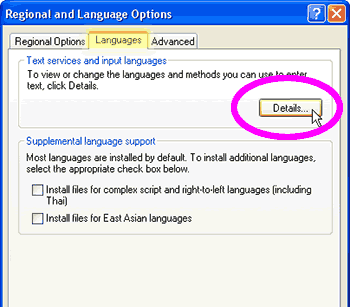
Figure 5: Dialog box for changing input languages
The Text Services and Input Language dialog box appears. In the larger square in the middle, you will see the installed keyboard layouts available to your desktop. You want to activate the Tibetan keyboard you installed earlier, so you will click on the button “Add…” (Figure 6)
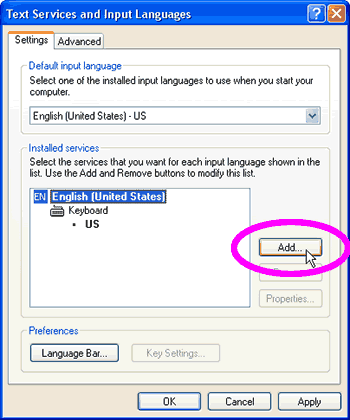
Figure 6: Adding more keyboard layouts
You will then see a smaller box asking two questions: 1) “What is the input language?” and 2) “What keyboard layout for that language do you want to add?” Regardless of the fact that you have installed a system Tibetan keyboard, Windows XP does not acknowledge that Tibetan can be used as an input language (Microsoft Vista, on the other hand, not only recognizes Tibetan as an input language, but comes with a Tibetan input method already installed). Because of this lack in Windows XP, you need to first designate another language as a place holder for the Tibetan keyboard layout. The choice is arbitrary; here we have chosen “Tartar.” (Figure 7)
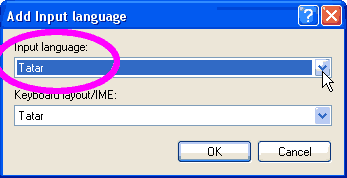
Figure 7: Choosing any language as input language
After you make a choice of input language, you will then choose a keyboard layout to associate with that input language. Though it may seem strange to match a keyboard layout for a language that has nothing to do with Tibetan, this is precisely what we must do. Select the new keyboard layout you installed earlier (Figure 8).
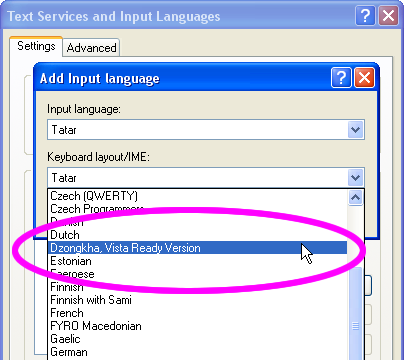
Figure 8: Choosing your newly installed input method
You now have the designated a non-Tibetan language to stand-in and support a Tibetan keyboard layout. Press “OK.” (Figure 9)
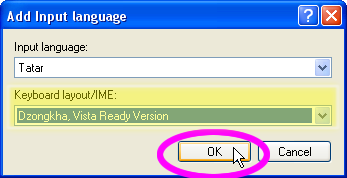
Figure 9: Adding the keyboard layout
You should now see that your list of input methods has increased. If you want to assign hotkeys to your keyboard methods, you can do so now by pressing on the button “Key Settings…” Otherwise, you can assign hotkeys later and continue straight away to test your new input method. Click “OK” to exit the dialog box (Figure 10).
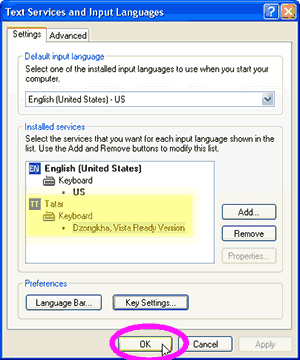
Figure 10: The new list of input methods
Click “OK” to get out of the Regional and Language Options (Figure 11).
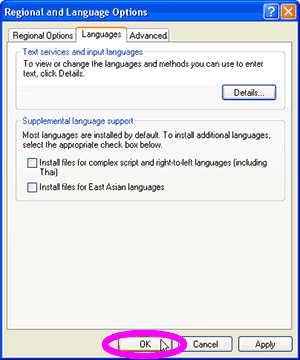
Figure 11: Closing up the Language Options
Now, at the bottom left of your screen, you should see an icon with a two-letter abbreviation. If you click on that spot, you will see that a new language has been added to your list of available choices. The new Tibetan input method should now be associated with the non-Tibetan language you chose earlier (Figure 12). If you have a suitable application for displaying Tibetan Unicode (such as Microsoft Office 2007) and have a Tibetan Unicode font installed (such as “Tibetan Machine Uni”), you should be able to test your new keyboard. Open up your text editor, make sure that the new layout has a check mark next to it, and give it a try!
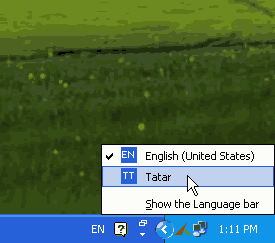
Figure 12: Selecting the new input method for text editing
If your Tibetan characters fail to stack correctly, it is most likely due to improper display issues and not because of any fault of the keyboard. Be sure to read and review other instructions about using Tibetan Unicode in Windows XP, especially if you expect to use Tibetan Unicode in applications other than Office 2003 or 2007.