THL Toolbox > Images & Immersive Technologies > QTVRs > QTVR Panaroma Shooting Manual
QTVR Panaroma Shooting Manual Technical Documentation
Contributor(s): Mark Turin.
This page was written by Mark Turin in May 2003, after visiting UVa and learning a little about QuickTime VRs from Will Rourk and David Newman. I have documented my understanding of the process of assembling the technology and also incorporated a few tips from Will and David who both have extensive experience in using this equipment. This page was updated in Kathmandu, Nepal, on August 21st, 2003.
Assemble the Tripod
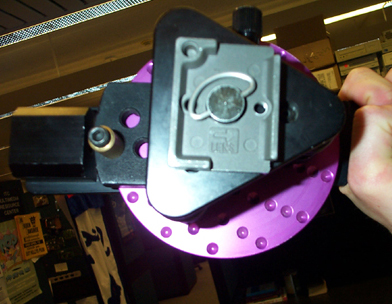
If choosing to purchase a tripod for the first time, a static (still camera) tripod is preferable to one with a fluid head since the desirable state is for as little movement as possible in the tripod itself. The fewer moving parts it has, in short, the more stable it will be when assembled. It is better to make the minor adjustments with the VR rotating head. Having stabilized the tripod and taken a torpedo level reading (as near to perfectly horizontal as possible), attach the first component of the revolving head. This also has a level in it and the level should be checked all the way around (one turn) to make sure that the head is level in all click positions. Minor adjustments can be made using the three adjustment rings under the purple head seen below:

Attach the Arm
Next, attach the first arm component as follows, and loosen the knob so that the arm can extend out and lock into 0 degree position (perpendicular to the arm base) as seen below:

Attaching the Base Plate to the Camera
Then take the camera base plate…

…and attach the camera using the screw underneath. The black positioning block should not be tightened since it will need to be finely adjusted later:

Having attached the camera (facing out), slide this whole attachment on to the vertical arm of the head mechanism as illustrated below:

Center the Camera
Now center the camera by turning it to face the purple round and black and white pattern and make sure that this is well and truly centered, then return it to the 90 degree position. The set up should now look like this:

Taking a Light Reading
It is important to take an average light reading across the full 360 rotation, by taking a reading on the lightest and then the darkest things in the room. Then assume a middle setting, an average or mean point, weighting towards the more important parts of the image (building, painting, ritual etc) as need be. Try and keep an aperture of around 5.6 to 2.8 for a depth of field which is suited to panoramic photography.
Photography
Now we are ready to take photos. With my camera lens (28mm -120mm), it is necessary to have 14 clicks at 0 degrees, 14 clicks at +45 degrees and 14 clicks at -45 degrees. Then one at + 90 degrees (sky) and one at -90 degrees (ground). This will ensure a 30% overlap which is required for the stitching software. Do the 0 degrees first, noting down in a log book the number of photos and start and stop image number, then continue as per above. Getting the top +90 shot is easy, turn the rotating arm upwards.
The down shot will have the purple base plate in prominent view - it is up to photographer whether to shoot this or to remove the camera from the head and hold steady and shoot the earth. Keep sun spots and rain out of the shot, and people also if at all possible. The image below shows the adjustment system for the clicks per rotation. More information on how many shots per rotation (only a guide, do not follow religiously), can be found at  Realviz.
